Problem 1

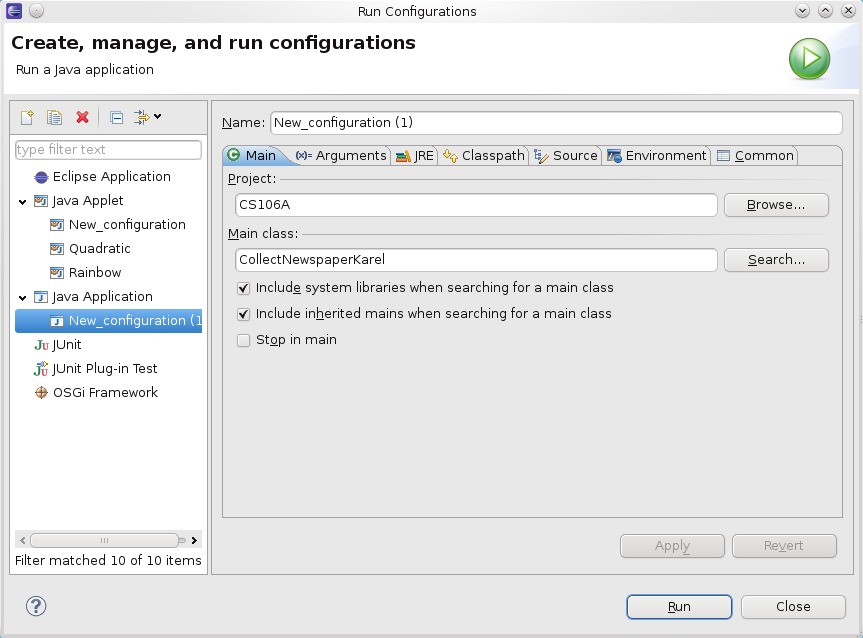
To start off with, I am using Eclipse and have attached my settings to get it to work with this assignment.

And now to actual run the code you need to include some things from the acm.jar file, since that is what is mainly being used to hide allot of the Java main implementations. So if you goto the the Package Explorer on the left hand side, and double click on the Package->default packages->CollectNewsPaper.java then to setup the environment for running this java file you need to goto Run->Run Configurations.. on the left options make sure that Java Applications -> New configuration is selected and then select the Project name as the Package and then tick the “include system libraries when searching for the main class” and also the “include inherited mains when searching for the main class”, then on the “main class” option, click search and find the CollectNewsPaper. Here is a image of how it should look.

Eclipse CS106A settings

Now, you should just see a robot (Karel) in the top left of the house and that is about it, we need to write the run() method for him to pick up the newspaper, so alter the code to the below.

/*
 * File: CollectNewspaperKarel.java
 * --------------------------------
 * At present, the CollectNewspaperKarel subclass does nothing.
 * Your job in the assignment is to add the necessary code to
 * instruct Karel to walk to the door of its house, pick up the
 * newspaper (represented by a beeper, of course), and then return
 * to its initial position in the upper left corner of the house.
 */
 
import stanford.karel.*;
 
public class CollectNewspaperKarel extends SuperKarel {
 
	private void getPaper()
	{
		move();
		turnRight();
		move();
		turnLeft();
		move();
		move();
	}
 
	private void pickUpPaper()
	{
		pickBeeper();
	}
 
	private void goBack()
	{
		// turn around basically
		turnRight();
		turnRight();
		move();
		move();
		move();
		turnRight();
		move();
		turnRight();
	}
 
	public void turnLeft()
	{
		turnRight();
		turnRight();
		turnRight();
	}
 
	// You fill in this part
	public void run()
	{
		getPaper();
 
		pickUpPaper();
 
		goBack();
	}
}

and then run again and if you click “start” he will go and pick up the newspaper and return back to where he started from.

I am finding this CS106A fun. In the above zip file there is the full source code for all of the parts to assignment 1, and also the assignment in a PDF file. But I shall place each part on a different post.

Threading – run another part of the program in a separate process

Threading in Java is very similar to the threading in c#, just like the example that I did before (threading in c sharp, running different-parts-of-the-program-at-once. What threading does is to allow for a part of your program to be run from within another process, this process runs normally independently of the main program (you can have links if you wanted to so some memory references).

The operating system gives the impression that it is running allot of programs at the same time, but what is happening that allot of processes (programs) have access to the CPU for a limited amount of time, e.g. 10 milliseconds, and then leave the CPU execution stage whilst another process will enter there CPU execution stage (this is the part where the program is actually doing something).

So lets say that you want to spawn off another process that will talk to a server to get information back e.g. a tab browsing on a modern web browser, whilst you look at another part of the main program e.g another tab, and communicate with that one e.g. type in your login details etc.

So let start with a example of how to create a thread-able program. Here my class basicThread extends the class Thread, which encapsulate the thread-able interface.

public class basicThread extends Thread {

this thread-able interface basically only wants to have the method “run” implemented”, since that is what is called when you start the new thread.

	public void run()
	{
		System.out.println("Before my sleep");
		for (int i =0; i < 10; i++)
		{....

and then in your main program you just need to create a basicThread class and call the start method (from the Thread class that basicThread class inherited from)

		// create the thread, a thread is independent of the main program
		basicThread me = new basicThread();
		// then start it. this calls the run method
		me.start();

and that is it, it will spawn off another process that will run separately in time from the main process.

Here is the full source code, I have also included a file zip that has the source code and also the class files attached, save this as callThread.java

public class callThread {
	public static void main(String[] args) {
		// create the thread, a thread is independent of the main program
		basicThread me = new basicThread();
		// then start it. this calls the run method
		me.start();
 
		// so if the basic thread had that pause it in..
		System.out.println("main thread here!!");
		for (int j =0; j < 5; j++)
		{		
			System.out.println("Mainthread about to sleep at number : "+j);
			// need to pause the main thread
			try{
			  Thread.currentThread().sleep(100);//sleep for 1000 ms
			}	catch(Exception ie){
			}
		}
		System.out.println("End of the main thread");
 
	}
 
}

save this as basicThread.java

public class basicThread extends Thread {
	public void run()
	{
		System.out.println("Before my sleep");
		for (int i =0; i < 10; i++)
		{
			System.out.println("basicThread sleeping at number : "+i);
			try {
				sleep(45);
			} catch (InterruptedException e)
			{
				System.out.println("could not sleep long enought there was a error!!");
			}
 
		}
		System.out.println("after the sleep :)");
	}
}

here is the output, as you can see the mainthread and the basicthread outputs interrupt each other just like any other process does within a CPU.

main thread here!!
Before my sleep
Mainthread about to sleep at number : 0
basicThread sleeping at number : 0
basicThread sleeping at number : 1
basicThread sleeping at number : 2
Mainthread about to sleep at number : 1
basicThread sleeping at number : 3
basicThread sleeping at number : 4
Mainthread about to sleep at number : 2
basicThread sleeping at number : 5
basicThread sleeping at number : 6
Mainthread about to sleep at number : 3
basicThread sleeping at number : 7
basicThread sleeping at number : 8
Mainthread about to sleep at number : 4
basicThread sleeping at number : 9
after the sleep :)
End of the main thread
Threading – running different parts of the program at “once”

A thread is when you “spawn” off another process (a process is like another program running within itself).

The operating system gives the impression that it is running allot of programs at the same time, but what is happening that allot of processes (programs) have access to the CPU for a limited amount of time, e.g. 10 milliseconds, and then leave the CPU execution stage whilst another process will enter there CPU execution stage (this is the part where the program is actually doing something).

To start with lets first create a method that is run within new thread, here we are just going to output a message and sleep for a bit, loop this over for 10 times.

// the method to create as a threadable method
public static void RunThisMethod()
{
	for (int i =0; i < 10; i++)
	{
		Console.WriteLine("RunThisMethod number : "+i.ToString() + " Sleep for 45");
		Thread.Sleep(45);
	}
}

Now lets create a thread, since a Thread has to be a delegated method but with .net 2 and above the .net environment will pick the correct delegate for you, so this means that you can just pass in the method name to the Thread class and that is it

	Thread theThread = new Thread(RunThisMethod);

To start the new Thread, it is as easy as start

	theThread.Start();

Here is the full source code, for demoing how the main and the runMyMethod flip between each other (e.g. each process has time in the processor(s) to run)

using System;
using System.Threading;
 
namespace myThread
{
	class MainClass
	{
		public static void Main (string[] args)
		{
			// initialize the RunThisMethod as a thread
			Thread theThread = new Thread(RunThisMethod);
			theThread.Start();
 
			for (int j = 0; j < 5; j++)
			{
				Console.WriteLine("Main method number : "+j.ToString()+" Sleep for 100");
				Thread.Sleep(100);
			}
		}
 
		// the method to create as a threadable method
		public static void RunThisMethod()
		{
			for (int i =0; i < 10; i++)
			{
				Console.WriteLine("RunThisMethod number : "+i.ToString() + " Sleep for 45");
				Thread.Sleep(45);
			}
		}
	}
}

and here would be the output

Main method number : 0 Sleep for 100
RunThisMethod number : 0 Sleep for 45
RunThisMethod number : 1 Sleep for 45
RunThisMethod number : 2 Sleep for 45
Main method number : 1 Sleep for 100
RunThisMethod number : 3 Sleep for 45
RunThisMethod number : 4 Sleep for 45
Main method number : 2 Sleep for 100
RunThisMethod number : 5 Sleep for 45
RunThisMethod number : 6 Sleep for 45
Main method number : 3 Sleep for 100
RunThisMethod number : 7 Sleep for 45
RunThisMethod number : 8 Sleep for 45
Main method number : 4 Sleep for 100
RunThisMethod number : 9 Sleep for 45

iterators – external wrapping of a class

As from the previous iterator post that wraps around a class (or within it as such, since that is where the implementation is). Here I am showing how to do some external wrapping of the class.

Since I am using Linux (with the KDE GUI) with a develop environment called kDevelop I have included the files with there full source code in the above zip file.

In essence the iterator interfaces (abstract classes that make you implement the methods required to allow for the iterator to work) are as defined as

template <class T>
class iteratorInterface
{
    virtual bool hasNext() = 0;
    virtual T next() = 0;	// next will also return the value
    virtual T getValue() = 0;
};
 
template <class T>
class iteratorInterfaceBaseClass
{
     virtual T begin() = 0;
     virtual T end() = 0;
};

when the actual class that is going to have a iterator external wrapper will implement the iteratorInterfaceBaseClass interface (abstract class with pure virtual functions “virtual T begin() = 0” where the “=0” is the pure part). Here is the class that is going to have a iterator external wrapping, if you notice it also implements the iteratorInferfaceBaseClass, with the anotherStackIterator being the actual iterator for the anotherStack class.

class anotherStack : public iteratorInterfaceBaseClass<anotherStackIterator>
{
  private:
    int intArray[MAXSIZE];
    int lastAdded;
 
  public:
    anotherStack();
 
    bool addValue(int value);
    bool addValueAt(int value, int place);
 
    int returnValueAt(int place);
 
    // for the iterator, return this and also NULL basically
    anotherStackIterator begin();
    anotherStackIterator end();
};

and here is the anotherStackInterface class structure, this does the implementation of a standard (std::) iterator in a forward direction (std::forward_iterator_tag) with returning a int (eger) value.

class anotherStackIterator : public iteratorInterface<int>, public std::iterator<std::forward_iterator_tag, int>
{
  private:
      int theStackRef;
      anotherStack *theStack;
 
  public:
      anotherStackIterator(anotherStack *stackP)  : theStack(stackP) { theStackRef = 0;}
 
      bool operator==(const anotherStackIterator otherValue);
      bool operator!=(const anotherStackIterator otherValue);
      int operator++();
      int operator++(int);
 
      // as from the iteratorInterface
      bool hasNext();
      int next();
      int getValue();
};

in essence all you are doing is looping through the data that you implemented in the main class (anotherStack) how you want to, for example when you want to setup the iterator and then loop through like this

    anotherStack stacky;
    stacky.addValue(4);
    stacky.addValue(2);
    stacky.addValue(10);
 
 
    for (anotherStackIterator iter = stacky.begin(); iter!=stacky.end(); iter++)
    {
	printf("value %d\n", iter.getValue());
    }

the iterator (iter) has to implement the iter++ process, a way to increment the pointer to the next data item within the anotherStack data structure and here is how it is done

int anotherStackIterator::operator++()
{
    if (theStackRef < MAXSIZE)
      theStackRef++;
    return theStack->returnValueAt(theStackRef);
}

the theStackRef is just a integer value that holds the place within the integer array from the anotherStack class and all is what is returned a value within the data structure, but because in the loop there is a test against if the iterator value has reached the end of the array e.g. the != (not equal to) and here is the test for that

bool anotherStackIterator::operator!=(const anotherStackIterator otherValue)
{
    if (theStackRef >=MAXSIZE) 
	return false;
    if (otherValue.theStack == NULL)
	return true;
    return (theStack->returnValueAt(theStackRef) != otherValue.theStack->returnValueAt(otherValue.theStackRef));
}

the full source code is included within the zip file attached. I had fun doing this.

loading images on the fly

To load a image from the server, local or remote depending if you are developing locally. I have been using monodevelop with the moonlight addin, this allows you to create silverlight applications with Linux :).

To start with, if you create a new solution by going to File->New->Solution and then selecting the moonlight Application project as similar to creating any other new project within monodeveloper (or within visual studio if you are using visual studio to create this silver light loading images on the fly).

Moonlight mono-develop project setup

And then within your main page.xaml file you need to define where you want the image to be placed.

		<Image x:Name="Image1" Source="dot.jpeg"></Image>
		<Button x:Name="Button1" Click="ButtonClick" Height="50" Content="Click" ></Button>

above also includes the Button that you are going to click onto to load the image, in this case it will call the ButtonClick function (from the above it is the “click” method). The ButtonClick is behind the page.xaml within the page.xaml.cs file (the csharp file).

So once that button has been clicked it will call this function

		public void ButtonClick(System.Object sender,System.EventArgs eventy)
		{
			System.Windows.MessageBox.Show("hi there");
			Image1.Source = new BitmapImage(new Uri("lcd.png", UriKind.Relative));
		}

I put a little message pop up window to say “hi there”, just so that you know it have been clicked encase the lcd.png (as taken from the open clip art website here) is not in the correct place, in this case it is placed within the bin/debug, but if you are using a release edition or using visual studio you may have somewhere else.

I have included the full source code and image within a zip file above, please feel free to download.

Here is the full page.xaml if you want to look over it.

<UserControl xmlns="http://schemas.microsoft.com/winfx/2006/xaml/presentation" 
             xmlns:x="http://schemas.microsoft.com/winfx/2006/xaml" 
             Width="500" Height="350"
             x:Class="moonlighttest.Page"
>
	<Grid x:Name="LayoutRoot" Background="Black">
		<Image x:Name="Image1" Source="dot.jpeg"></Image>
		<Button x:Name="Button1" Click="ButtonClick" Height="50" Content="Click" ></Button>
	</Grid>
</UserControl>

and here is the full page.xaml.cs file.

using System;
using System.Collections.Generic;
using System.Windows;
using System.Windows.Controls;
using System.Windows.Media;
using System.Windows.Media.Imaging;
 
namespace moonlighttest
{
 
	public partial class Page : UserControl
	{
 
		public Page ()
		{
			this.InitializeComponent ();
		}
 
		public void ButtonClick(System.Object sender,System.EventArgs eventy)
		{
			System.Windows.MessageBox.Show("hi there");
 
			Image1.Source = new BitmapImage(new Uri("lcd.png", UriKind.Relative));
		}
	}
 
}